
The first time I tried tiger face painting, I ended up looking like a very confused orange cat. Too much black liner. Not enough blending. Zero symmetry. I scrubbed it off, ordered better brushes, and started over.
You deserve better than trial-and-error smudges at 11 p.m. before a party. Whether you want a subtle tiger-inspired glam for an editorial shoot or a full painted tiger face for Halloween, the technique matters more than the products.
This guide covers tiger makeup from every angle, 23 distinct looks, the exact products that hold up under lights, and the mistakes that make or break a painted tiger face. By the end, you’ll know precisely which style suits your skill level and how to execute it cleanly.
Key Takeaways:
- Tiger makeup works best when you map your stripes to your actual facial structure, not a generic template.
- You need three core products: a creamy orange base, a matte black liner, and a white cream paint for highlights.
- Start with the nose and work outward; this anchors your symmetry and prevents lopsided stripes.
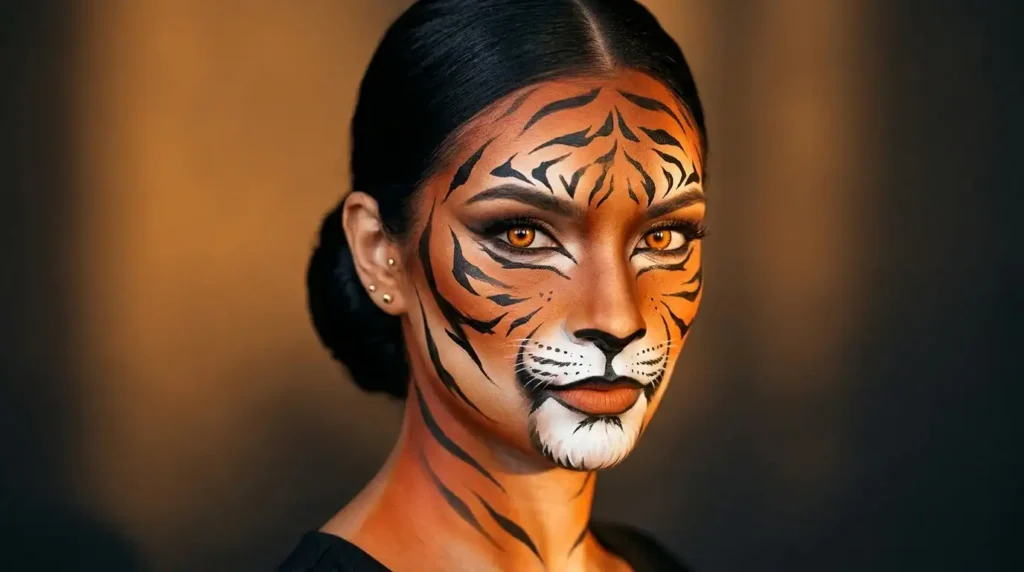
Tiger makeup is a face-painting technique that uses orange, black, and white pigments to replicate a tiger’s coat on human skin. Stripes follow the natural contours of the face, cheekbones, brow bone, and jawline, creating a fierce yet flattering effect. It ranges from subtle glam to full theatrical face paint tiger art.
What Is Tiger Makeup?

Tiger makeup is a face-painting and cosmetic technique that recreates a tiger’s striped coat on the skin using orange, black, and white pigments. The stripes follow facial anatomy rather than sitting flat, which separates editorial-level work from children’s party paint. Think runway editorial meets wildlife illustration.
At its core, this look borrows from three disciplines: theatrical face painting, editorial beauty, and body art. The result sits somewhere between a face-paint tiger design you’d see at a festival and a high-fashion eye look with graphic black liner.
Culturally, the tiger carries weight. It signals power, ferocity, and untamed beauty. That’s why tiger Halloween makeup spikes every October, but also why fashion houses like Kenzo and Roberto Cavalli keep the motif alive year-round. You’re not just painting stripes. You’re channeling an entire visual language.
The look scales beautifully. A single black-winged stripe across the cheekbone reads as editorial. A full painted tiger face with white muzzle detail reads as performance art. Both are valid. Both are gorgeous.
The Style Fundamentals

Before you pick up a brush, you need to understand the three pillars that separate a stunning tiger look from a messy one.
The Colour Palette: Orange, Black, and Why White Matters Most
Your base orange should lean warm; think burnt sienna mixed with a touch of golden yellow. Avoid neon oranges. It photographs flat and reads as costume, not craft.
Black stripes need to be truly matte. Glossy black catches light oddly and breaks the illusion of fur texture. Meanwhile, white does the heavy lifting most beginners skip. It creates the muzzle, brow highlights, and inner-eye brightness that make a tiger face painting look dimensional rather than flat.
Pro tip: Mix your orange with a tiny drop of red cream paint. That warmth mimics real tiger fur far better than straight orange.
The Brush Kit: What Actually Works
You need a minimum of four brushes. A flat shader brush for packing orange base. A fine detail liner (size 0 or 1) for stripes. A small, fluffy blending brush for softening edges. And a flat white brush for muzzle work.
Skip the sponge applicators that come in cheap face painting easy tiger kits. They deposit products unevenly and make crisp stripes nearly impossible. A $12 set of synthetic face-painting brushes from a theatrical supply shop outperforms any drugstore kit.
Mapping Stripes to Your Face Shape
Here’s where most tutorials fail you. They show a generic stripe pattern on a mannequin. Your face isn’t a mannequin.
The rule: Stripes should follow your bone structure. Place the thickest stripes along your cheekbones. Run thinner ones from your temples toward your hairline. Keep the forehead stripes symmetrical and slightly curved, never perfectly straight.
If you have a round face, angle stripes slightly downward to create length. For a longer face, keep stripes more horizontal to add width. This is the same principle makeup artists use for contouring. You’re sculpting with paint instead of bronzer.
How to Build Your Tiger Makeup Look: The Step-by-Step Guide

Time needed: 45 minutes
Follow these exact stages for a clean, long-wearing makeup tiger look. Each step is designed so a single photo can illustrate the progress. Work in natural light when possible and keep a mirror at eye level.
- Prep the Canvas
Cleanse and moisturise. Apply a thin layer of oil-free primer across the face and down the neck. This creates a smooth, grippy surface so cream products do not slide.

- Lay the Orange Base
Using a damp beauty sponge, press a sheer layer of warm orange or golden cream paint (or cream foundation mixed with orange pigment) over the face, ears, and upper neck. Blend thoroughly into the hairline and jaw, so there is no hard edge. Keep the centre of the face slightly lighter.

- Map the Stripe Placement
With a white or beige pencil, lightly sketch the main stripe paths: two or three lines radiating from the outer eye corners across the temples and forehead, plus cheekbone lines that follow the natural hollows. This prevents guesswork later.

- Paint the Black Stripes
Load a flat synthetic brush with deep black cream or water-activated paint. Follow the mapped lines, starting thicker near the hairline and tapering toward the centre of the face. Keep strokes confident and slightly irregular for a realistic tiger effect. Avoid the immediate eye area for now.

- Define the Nose and Upper Lip
Use a small detail brush to paint a classic black tiger nose (rounded or slightly heart-shaped). Add two or three short vertical lines above the upper lip for whisker spots. Soften the outer edges of the nose paint so it blends into the surrounding base.

- Add White Highlights and Dimension
With a clean small brush or fingertip, place soft white or cream paint along the bridge of the nose, under the eyes, on the centre of the forehead, and along the tops of the cheekbones. This lifts the face and stops the orange from looking flat.

- Finish the Eyes
Line the upper lash line in black and extend it slightly outward. Smoke a touch of black or deep brown into the outer crease if desired. Place a small amount of white or gold in the inner corners. Optional: add a few fine black lines radiating from the outer corners to echo the face stripes.

- Set and Lock
Dust translucent powder lightly over the entire face with a fluffy brush. Follow immediately with a strong setting spray held 20–30 cm away. Let it dry completely. Blot any shine only if needed.

23 Tiger Makeup Ideas for 2026

1. The Classic Full-Face Tiger

Think: the gold standard of tiger face painting. Orange base, bold black stripes, white muzzle, and those unmistakable whisker dots. This is the look that stops people at Halloween parties and makes kids ask, “How did you DO that?”
Build this with cream-based paints, not water-activated cakes. Cream formula blends smoother and lasts longer under party lights. Use a stippling motion for the orange base to create a subtle fur texture. Finish with individual false lashes to frame the eyes dramatically.
2. The Minimalist Single-Stripe Glam

One bold black stripe sweeps from the inner corner of your eye across the cheekbone and fades toward the ear. The rest of your face stays clean with dewy skin, a warm bronze shadow, and a nude lip. It’s tiger energy whispered, not shouted.
This works beautifully for fashion events, editorial shoots, or any night you want intrigue without full commitment. Use a liquid liner with a flexible brush tip. Draw the stripe freehand first in pencil, then trace over in black. The asymmetry is the point.
3. The Sunset Gradient Tiger

Instead of flat orange, blend a gradient from deep tangerine at the temples to soft peach across the cheeks and nose. Black stripes stay crisp, but the base colour shifts like a sunset sky. White highlights sit on the high points of the face.
This variation photographs extraordinarily well in golden-hour light. Use cream blushes layered over the face paint base to build the gradient. A damp beauty sponge blends the transitions seamlessly. Pair with warm-toned eyeshadow in copper and amber.
4. The White Tiger (Reverse Palette)
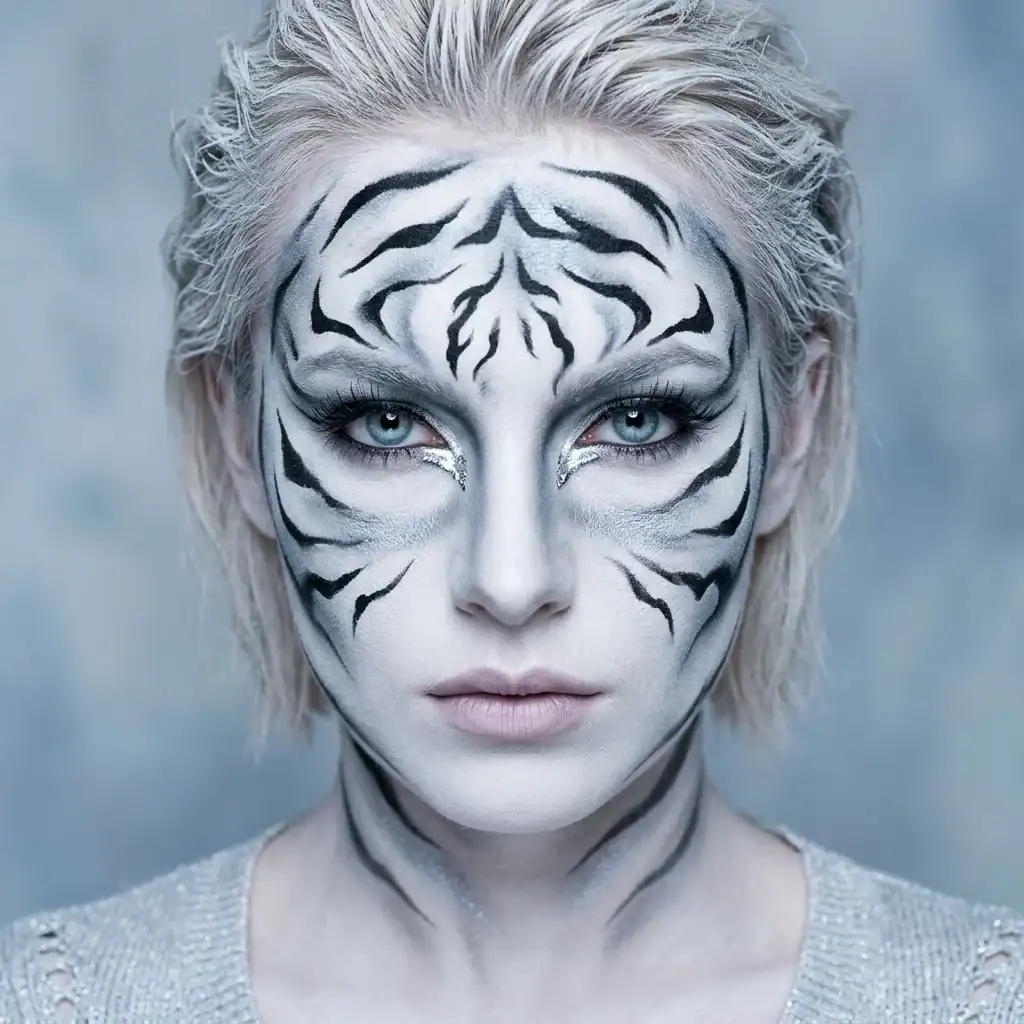
Flip the script entirely. White base across the whole face. Black stripes stay the same. But instead of orange, use soft grey and silver tones for depth. The effect is ethereal, almost ghostly, like a snow tiger rather than a Bengal.
This look demands matte products throughout. Any shimmer breaks the icy illusion. Set with a generous dusting of translucent powder. Add silver glitter sparingly at the inner corners for a frosty catchlight. Stunning for winter parties and fashion editorials.
5. The Half-Face Tiger Reveal
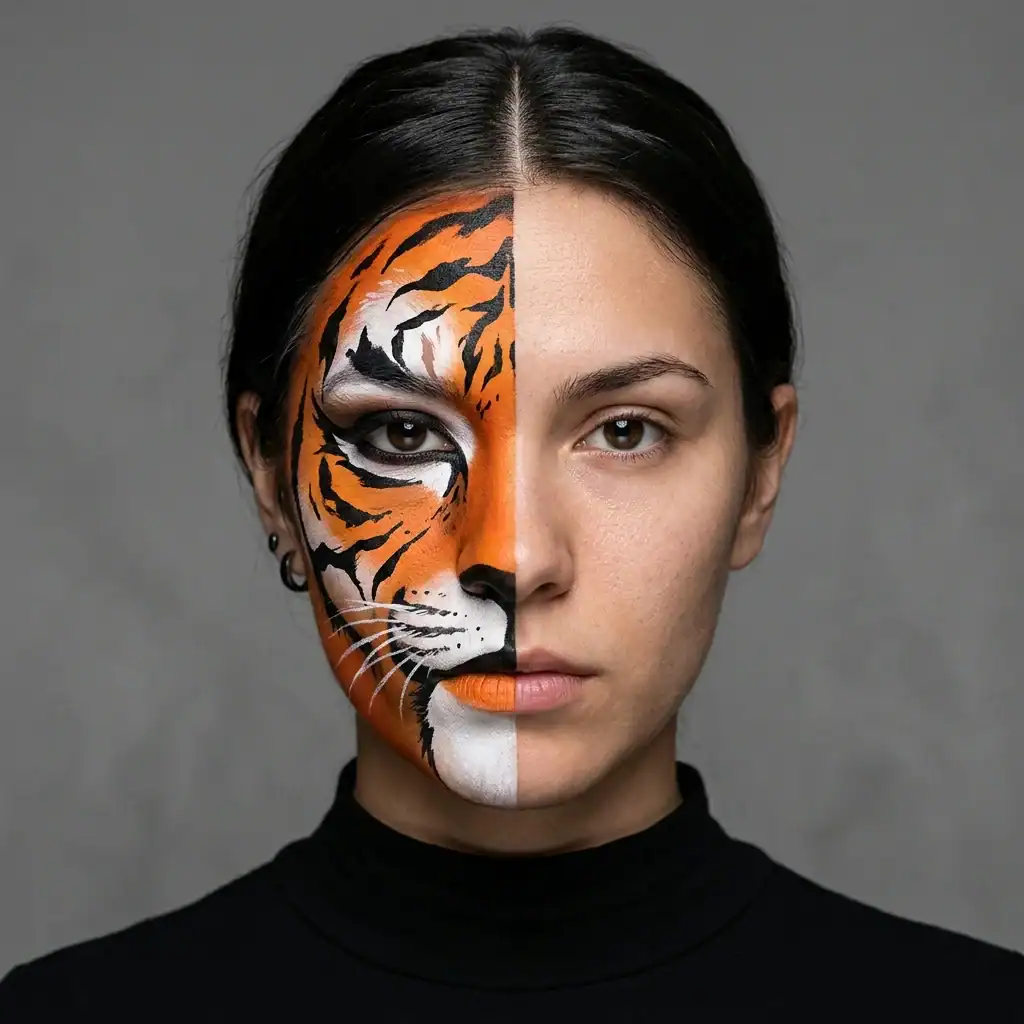
Paint the full tiger design on one half of your face only. Leave the other half bare or in a simple nude glam. The contrast creates visual tension that photographs like editorial art. It’s the look that gets saved to Pinterest boards by the thousands.
Use a strip of medical tape down the centre of your nose and forehead as your dividing line. Paint one side, let it dry, then peel the tape for a razor-sharp edge. This is your face paint: a tiger, an easy option if full coverage feels intimidating.
6. The Graphic Liner Tiger

No face paint at all. Instead, use black liquid liner to draw tiger stripes radiating from your eyes. Orange shadow fills the lids. White pencil lines separate the black stripes. The effect reads as high-fashion editorial thinking: Pat McGrath meets wildlife.
This works for anyone who wants tiger energy without touching face paint. Keep skin flawless and matte. The focus lies entirely on the eyes. Add a bold orange-red lip to tie the palette together without competing with the eye work.
7. The Cub-Like Soft Tiger

Softer stripes. Rounder shapes. A smaller white muzzle concentrated on the nose and chin. This version reads younger, sweeter, more playful, perfect for kids or for adults who want approachable charm over fierce drama.
Use a damp sponge to soften every stripe edge. No hard lines anywhere. The orange should lean more peach than tangerine. Add tiny round black dots for whisker spots instead of drawn whisker lines. It’s the tiger easy face painting version that takes ten minutes flat.
8. The Neon Festival Tiger

Swap traditional orange for electric coral or hot magenta. Keep the black stripes but make them slightly thicker, more graphic. Add UV-reactive white paint so the design glows under blacklight. This is your Coachella, your Pride parade, your summer festival statement.
UV-reactive paints need a specific setting spray; regular ones dull the glow. Test your products under a blacklight before the event. Pair with neon accessories and slicked-back hair to let the face do all the talking.
9. The Smoky Tiger Eye

Concentrate the entire design around the eyes only. Black stripes fan outward from the outer corners like a dramatic cat-eye on steroids. Orange shadow packs the lids. White liner opens the waterline. The rest of the face stays neutral and clean.
This is the most wearable tiger makeup option for date nights, concerts, or any event where full face paint feels too much. Use waterproof products throughout. The design should survive dancing, humidity, and at least one emotional conversation.
10. The Geometric Tiger

Instead of organic curved stripes, use angular, geometric shapes. Triangles and sharp chevrons replace the flowing lines of a traditional tiger. The palette stays orange-black-white, but the execution feels architectural and modern.
Use thin strips of washi tape to mask off geometric sections before painting. Fill each shape with a different tone. Peel the tape for crisp edges. This look suits angular face shapes and pairs beautifully with sleek, pulled-back hairstyles.
11. The Watercolour Tiger

Soften everything. Stripes bleed at the edges like wet paint on paper. Orange blends into pink; black fades into grey. The effect is dreamy, artistic, slightly imperfect, and that’s the entire point. It looks hand-painted by an artist, not stamped by a stencil.
Achieve this by dampening your brush before loading paint. Let each stripe sit for three seconds, then drag the edges outward with a clean, damp brush. Work quickly before products are set. The imperfection is what makes this version feel alive.
12. The Gilded Tiger

Black stripes stay, but replace orange with warm gold metallic cream paint. Add tiny gold leaf flakes pressed into the high points of the cheeks and brow bone. The result is opulent, regal, almost sacred: a tiger as deity rather than animal.
This look demands warm lighting to photograph properly. Use a cream-based gold rather than glitter for sophistication. Pair with gold jewellery, a slick bun, and a deep bronzed complexion. It’s your New Year’s Eve showstopper.
13. The Tiger Meets Butterfly Hybrid

Tiger stripes on the upper face. Delicate butterfly wing shapes in orange and black radiating from the cheekbones downward. The two motifs merge at the temples. It’s unexpected, intricate, and absolutely stops conversation at any event.
Sketch the butterfly wing shapes in white pencil first. Then fill with orange and outline in black. Keep the tiger stripes on the forehead and brow area traditional. The hybrid point where they meet should feel seamless, not stitched.
14. The Men’s Minimal Tiger

Three bold black stripes across the cheekbone. A hint of orange shadow at the temples. Clean skin everywhere else. This is the face paint tiger version for anyone who wants impact without elaborate artistry. Five minutes, three products, done.
Use a matte black cream paint rather than liquid liner for a more natural, less “made-up” finish. The stripes should look almost tribal rather than cosmetic. Pair with stubble or a clean jawline. No other makeup needed.
15. The Vintage Circus Tiger

Slightly exaggerated stripes. A painted-on red nose option. The white muzzle extends further up the cheeks. Everything leans theatrical and old-world, as a 1920s circus poster comes to life. Rich, warm lighting completes the mood.
Use a slightly thicker brush than you’d normally reach for. The stripes here are bold, unapologetic, slightly uneven in that charming hand-painted way. Add a beauty mark or two for extra character. Red lips seal the vintage narrative.
16. The Tiger Ombré Lips

Full tiger design on the face, but the lips get special treatment. Orange fades to black at the corners in a gradient ombré. The effect ties the whole design together and prevents the lips from looking disconnected from the face art.
Apply orange lipstick first. Then use a small brush to press black shadow into the outer corners. Blend the meeting point with a clean finger. Set with a clear gloss in the centre for dimension. This detail elevates the entire look.
17. The Galaxy Tiger

Black stripes remain, but the orange base is replaced with deep navy and purple tones. Add tiny dots of white and silver scattered like stars. The tiger meets the night sky. It’s unexpected, slightly surreal, and utterly mesmerising under flash photography.
Build the galaxy base with cream paints in navy, plum, and a touch of teal. Use a clean toothbrush to flick tiny white dots for stars. Keep the black stripes crisp and traditional; the contrast between structured stripes and cosmic colour is the entire drama.
18. The Tiger Contour Sculpt

Use tiger stripes as actual contouring. Black stripes sit in the hollows of cheeks, along the jawline, and at the temples, exactly where you’d place bronzer. Orange highlights sit on the high points. The design simultaneously paints a tiger AND sculpts your face.
This is the most technically impressive version. Study your face in natural light first. Mark where shadows naturally fall. Then place your black stripes precisely there. The result looks like your face is carved from amber and obsidian. Breathtaking photographs.
19. The Floral Tiger

Traditional tiger stripes on the upper face. But from the jawline down, the stripes dissolve into trailing orange and black florals: marigolds, poppies, dark roses. The transition should feel organic, as if the tiger is blooming.
Paint the stripes first, then let them “break apart” as they travel downward. Use a fine brush to pull stripe ends into petal shapes. Add tiny dots of white and gold at flower centres. This is your tiger Halloween makeup option that feels more like art than a costume.
20. The Chrome Tiger

Matte black stripes, but the orange base is replaced with a chrome or metallic copper finish. The effect is futuristic, almost robotic, a cyber-tiger for the year 2026. Light bounces off the metallic base and creates shifting reflections with every head turn.
Use a metallic cream paint as your base. Set it with a matching metallic powder to lock the shine. Keep the black stripes ultra-matte for contrast. This look demands minimal jewellery; the face IS the accessory. Slick hair back. Let the chrome do the work.
21. The Tiger Body Extension

The face design is traditional, but the stripes continue down the neck, across the collarbones, and onto the shoulders. The effect transforms the entire upper body into a canvas. Wear with an off-shoulder top or bare shoulders for maximum impact.
Use a larger flat brush for the neck and body stripes. They can be slightly wider than face stripes to match the larger surface area. Set everything with a body-safe setting spray. This is the festival main-stage look. Commit fully or don’t start.
22. The Pastel Tiger

Soft lilac replaces orange. Muted charcoal replaces black. Cream white stays. The entire design reads as a watercolour whisper rather than a roar. It’s gentle, feminine, and perfect for spring events, baby showers, or anyone who finds traditional tiger tones too bold.
Mix your pastels with a touch of white cream paint to soften them further. Keep stripes thin and delicate. Add tiny pearl dots along the stripe edges for a subtle shimmer. This is the face painting easy tiger version for sensitive, romantic aesthetics.
23. The Tiger Eye Mask

Paint the full tiger design only across the eye area, from the brow bone to the upper cheekbone, spanning the nose bridge like a mask. Meanwhile, leave the forehead, lower cheeks, and mouth area completely clean. As a result, the effect is mysterious, masquerade-ball elegant. Consequently, this works beautifully with a bare lip and glowing skin. Additionally, the “mask” should have crisp edges to achieve this. Use concealer to sharpen the borders after painting. Then, add small orange gems or gold leaf at the outer corners for extra drama. In the end, that’s your makeup tiger moment, distilled to its most elegant form.
Looking back, you started this guide, maybe feeling like that first attempt I described smudged, uncertain, staring at a lopsided stripe and wondering where it went sideways. But now you know the architecture: first, the nose anchor; next, the centre-out method; then, the white that lifts everything; and finally, the setting sandwich that keeps it locked for hours.
The Tiger Makeup Kit: What to Buy & What to Skip
What earns a permanent spot in your kit:
A cream-based face paint palette in orange, black, and white. Look for brands like Mehron, Snazaroo, or Diamond FX; they’re theatrical-grade, skin-safe, and blend beautifully. A set of four synthetic brushes (flat shader, detail liner, fluffy blender, small flat). Translucent setting powder. A face-paint-specific setting spray.

What to skip entirely:
Those $6 drugstore “tiger face paint kits” with the tiny sponge applicators and chalky cakes. The pigments are thin, the brushes are useless, and the orange always looks like a traffic cone. You’ll redo the whole face twice. Not worth the frustration.
Also skip any product labelled “acrylic” or “craft paint.” These are not skin-safe. They cause reactions, crack painfully, and won’t blend. If it’s not labelled “cosmetic grade” or “face and body safe,” it doesn’t touch your face.
The worth-it splurge: A quality detail liner brush. You’ll use this for every stripe, every whisker dot, every tiny correction. A $14 Kolinsky-style synthetic liner outlasts ten cheap brushes and holds a finer point. This single tool changes your results more than any product upgrade.
Common Tiger Makeup Mistakes (And How to Fix Them)

Mistake 1: Stripes that are perfectly symmetrical. Real tigers aren’t symmetrical. Perfectly mirrored stripes look robotic. Fix: vary the thickness slightly. Let one side have an extra-small stripe. The asymmetry reads as organic.
Mistake 2: Starting from the outside and working in. You’ll lose your centre reference and end up lopsided. Fix: always paint the nose stripes first. They anchor everything. Then work outward to cheeks, up to forehead, down to jaw.
Mistake 3: Using liquid foundation as your orange base. It’s too thin, too sheer, and mixes badly with face paint. Fix: Use cream-based face paint specifically. It’s opaque, blendable, and designed to layer.
Mistake 4: Forgetting the white. Without white highlights on the muzzle, brow, and inner eyes, the design looks flat and muddy. Fix: Always add white AFTER your black stripes. It lifts the whole design into three dimensions.
Mistake 5: Overloading the brush. Dripping paint creates thick, gloopy stripes that crack as they dry. Fix: Wipe excess product on the back of your hand first. You want the brush loaded but not dripping. Thin layers build better than one thick layer.
Mistake 6: Rushing the dry time between layers. Smudging your orange base while adding black stripes is the most common beginner disaster. Fix: wait 60–90 seconds between colour layers. Fan your face gently. Patience here saves you from starting over.
Charles and Sara Styling Tips

The biggest shift in tiger makeup for 2026 is the move toward hybrid designs. Pure traditional tiger faces are giving way to mixed motifs: tiger stripes merged with florals, geometric shapes, or celestial elements. The look feels more personal, more artful, less “Halloween costume aisle.”
Colour theory is your secret weapon here. Orange and blue are complementary opposites. If you add even a hint of blue or teal into your background (behind the stripes, at the edges), the orange vibrates harder. This is the same principle fashion designers use when pairing rust with navy.
Proportion matters. If your stripes are thick and bold, keep the rest of your look minimal: clean hair, simple earrings, bare neck. If your stripes are delicate and numerous, you can afford a statement earring or a bold lip. Balance the visual weight.
For 2026 specifically, expect to see more chrome and metallic tiger bases, more UV-reactive festival versions, and more “tiger as contour” techniques where the stripes genuinely sculpt the face rather than simply decorating it. The boundary between face painting and editorial makeup continues to dissolve.
Finally, setting technique determines whether your look lasts two hours or eight. Layer translucent powder over cream paint, then mist with setting spray, then dust one more micro-layer of powder. This sandwich method locks everything for a full night.
FAQs: Tiger Makeup Questions Answered
Tiger makeup is a face-painting technique using orange, black, and white pigments to replicate a tiger’s striped coat on skin. Stripes follow facial contours for a flattering, dimensional effect. It ranges from subtle single-stripe glam to full theatrical face art.
A full traditional design takes 15–25 minutes for someone with moderate practice. Beginners should budget 35–45 minutes. Minimal versions of a single stripe or eye-only design take under 10 minutes. Rushing causes smudging, so build in buffer time.
You need cream-based face paint in orange, black, and white. Add a set of four synthetic brushes, translucent setting powder, and a face-paint setting spray. Avoid craft paints or acrylics; they’re not skin-safe and won’t blend properly.
Not at all. Minimal versions work for editorial shoots, festivals, fashion events, and nights out. A single graphic stripe or a smoky tiger eye reads as high-fashion rather than costume. The full traditional design peaks at Halloween, but the technique applies year-round.
Apply in thin layers, letting each dry before adding the next. Set with translucent powder, then mist with setting spray, then powder again. Avoid touching your face. Carry a tiny brush and black paint for quick touch-ups at the jawline.
Conclusion
You started this guide, maybe feeling like that first attempt I described: smudged, uncertain, staring at a lopsided stripe, wondering where it went sideways. Now you know the architecture. The nose anchor. The centre-out method. The white that lifts everything. The setting sandwich that keeps it locked for hours.
Pick the one look from these 23 that made you think, “Yes. That’s the one I want to try.” Then gather your three colours, your four brushes, and give yourself 30 unhurried minutes. The first attempt won’t be perfect. The second one will surprise you.


